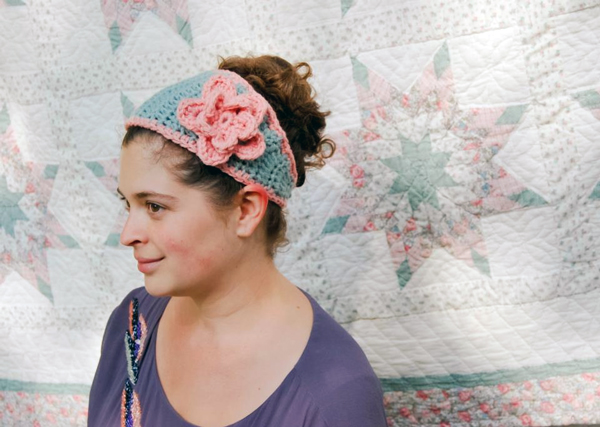
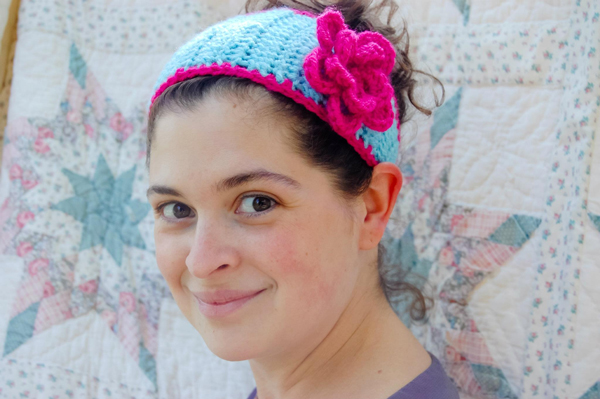
I’ve been trying to polish up my site and I realized one of my most popular patterns was full of dead photo links. I also realized it wasn’t even a pattern but just some nice photos of my wearing a bunch of my headbands — pretty much useless to all of you! Instead of just updating the post, which was from three years ago, I figured I’d just start anew and reintroduce it.
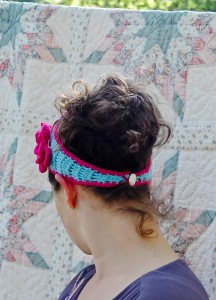
This simple crocheted headband is my best-selling product. I sell out of it at Bella Boutique every holiday season. You can’t go wrong — it’s colorful and has a huge flower on it. I also love embellishing the back of the headband with a vintage button.
The pattern is inspired by Knitty.com’s Calorimetry Headband, which I like, but is really too wide for my head. I also get bored by the ribbing pattern. I wanted something that I could create quickly for my short attention span. I relied on this pattern for the base and then added a simple trim and my own flower pattern, instructions for which can be found here.
Many thanks to my old friend Laura for taking (and recovering) these shots. She was just starting out her photography business when these were taken and they are lovely!
I originally made two versions of this pattern, one with worsted yarn and the other while crocheting two strands of worsted at the same time. I prefer the double stranded version because it’s fuller looking. You can do a single strand but you may have to extend the ends by a couple of rows.
Tapered Flower Headband
Materials:
- Size J crochet hook
- Two colors of worsted yarn, I prefer Vanna’s Choice by Lion Brand.
- One medium button
- Darning needle
- Thread
- ch = chain
- dc= double crochet
- dc2tog = double crochet two stitches together
- sc = single crochet
- sl = slip stitch
Instructions:
- *Crochet two strands of the same color throughout the pattern*
- Instead of increasing/decreasing on the outer edges of the work, you’ll be increasing/decreasing in the middle of the work every other row.
- With main color, ch 4. Dc into third stitch from hook. Dc into last stitch. 2 ch, turn. (2 st)
- Dc across, 2 ch, turn, (2 sts.)
- 2 Dc in each stitch across (4 sts.)
- Dc across all stitches
- Dc in first st, 2 dc each in next 2 sts, dc in last st. ch 2, turn. (6 sts.)
- Dc across all stitches
- Dc in first 2 sts, 2 dc each in next 2 sts, dc in last 2 sts, ch 2, turn (8 sts.)
- Dc across all stitches
- DC in first 3 sts, 2 dc each in next 2 sts, dc in last 3 st, ch 2, turn (10 sts.)
- Dc across all stitches
- DC in first 4 sts, 2 dc each in next 2 sts, dc in last 4 sts, ch 2, turn (12 sts.)
- Dc across all stitches
- DC in first 5 sts, 2 dc each in next 2 sts, dc in last 5 sts, ch 2, turn (14 sts.)
- Dc across all stitches
- ** THIS PART IS DIFFERENT** Dc in first 6 sts, dc in next st, dc in last 7 sts, ch 2, turn (15 st)
- Dc across all stitches
- Begin decrease as follows:
- Dc in first 6 sts, dc2tog, dc in remaining sts, ch 2, turn (14 sts)
- Dc across all stitches
- Dc in first 5 sts, dc2tog, dc2tog, dc in remaining sts, ch 2, turn (12 sts.)
- Dc across all stitches
- Dc in first 4 sts, dc2tog, dc2tog, dc in remaining sts, ch 2, turn. (10 sts.)
- Dc across all stitches
- Dc in first 3 sts, dc2tog, dc2tog, dc in remaining sts, ch 2, turn (8 sts)
- Dc across all stitches
- Dc in first 2 sts, dc2tog, dc2tog, dc in remaining sts, ch 2, turn (6 sts.)
- Dc across all stitches
- Dc into first stitch, dc2tog, dc2tog, dc into last stitch, ch 2, turn (4 sts)
- Dc across
- Dc2tog, dc2tog, ch 2, turn, (2 sts.)
- Dc across
- Now is the time to measure this around your head. If it’s not quite long enough, repeat the last row until it’s the length you need. Make a knot and weave in ends.
- With contrasting color, sl into one of the end stitches. Sc three four times into the end (to create a button hole), then sc all the way around the headband. Sl to first sc. Tie knot and weave in ends.
- Sew the button onto the non-buttonhole end of the headband.
Follow this tutorial for the flower instructions. Using a darning needle and a piece of the contrasting yarn, secure the flower on the top of the headband, a little off to the side. I like to try on the headband first and determine in the mirror where it should go.
Natasha was born and raised in Anchorage. She has always had a passion for making useful things, whether they are knit, crocheted, sewn or randomly glued and assembled. She received her bachelor’s degree in French and journalism from the University of Alaska Anchorage and spent six fulfilling years working at Skinny Raven Sports. She is currently Program Associate at Spirit of Youth and also does voice over work around town. If you're awake at 3 a.m. and tune into KLEF 98.1 you might hear Natasha delivering public service announcements. She lives in Anchorage with her husband, Stephen, and young son, Jack.


